Vacuum Bagging
 |
An ideal fiberglass layup minimizes the amount of resin because resin by itself adds weight without adding strength. When doing fiberglass layup by hand, it is hard to get the minimum amount of resin because you need enough to soak the cloth and the cloth doesn't lay completely flat against the surface. The solution to this is vacuum bagging.
Vacuum bagging uses atmospheric pressure to press the cloth tightly against the surface being covered so that the excess resin is squeezed out and soaked up in a disposable outer wrap. This technique requires a vacuum bag, vacuum pump capable of pulling a significant vacuum (at least 25 inches of mercury) and various accessories and supplies. Thus vacuum bagging has been mostly restricted to large commercial use and a few enterprising hobbyists.
Pius Morozumi and William Walby have invented a technique for doing vacuum bagging which uses a readily-available kitchen appliance, the FoodSaver, which provides the vacuum pump and bags in a convenient form! They developed this technique while building a set of six 6" rockets with 98mm motors for a research program and it has also been used in several other rockets.
This discussion assumes you're familiar with fiberglass covering of tubes. If not, read the article on Reinforcing Tubes first. Happy bagging!
Vacuum Bagging Theory
Vacuum bagging requires that the part being laminated be covered with cloth (as in hand layups). The part is wrapped with a thin film which is porous and will not stick to the epoxy, called "release," and a thick layer of absorbent material, called "breather." This whole assembly is then inserted into the vacuum bag and the air inside is removed by a vacuum pump. Because the air inside the vacuum bag is removed, the air pressure from the atmosphere outside the bag pushes tightly from all sides, pressing the bag
against the breather. The excess epoxy is squeezed out of the cloth, passes through the release and is soaked up by the breather. The breather also allows the air to flow away from the tube and out of the bag.
After partial cure (at least 12 hours for West System 206 hardener at room temperature), the part is removed from the bag and the breather and release are pealed off. Because epoxy does not bond to the release, this generally comes off easily. At this point, the breather has soaked up the excess epoxy and the remainder makes up only about half of the bulk, which is ideal.
At this point, the next layup can be applied, if there is one, or the tube can be left to completely cure. The next layup will form a chemical bond with the previous layup as long as the previous layup has not fully cured. A chemical bond is preferred between the layups. If the prior layup cures fully, you will have to sand it with coarse sandpaper so that the epoxy can grab onto the roughness to get a reasonable mechanical bond. (West System epoxy has a full cure in 1-4 days at room temperature.)
You keep hearing the phrase "at room temperature" because the cure rate of epoxy is highly dependent on the temperature. Higher temperatures speed up curing, which is desirable in most cases. In addition, "cooking" the tubes to speed up the cure actual increases the strength of the epoxy and most commercial parts use a "curing oven" to speed up the process and produce a stronger part. For most hobbyists, this is not practical, as the desired temperatures are too low for most kitchen ovens, but too high for most stand-alone heaters (150-200°F). People have used closed cars in the summer as a low-tech substitute. (The dashboard of a car can reach 180° on a hot summer day.) Note that most epoxies will not cure properly in cold weather and you should work and let the part cure in a heated area overnight. (For West System, keep the part over 60°F until fully cured.)
Bagging with the FoodSaver
The major piece of equipment you will need is a FoodSaver, which is used to preserve fresh food for freezing or room-temperature storage by removing the air around it. The system works by dispensing bag material which you can seal at one end and measure out the length necessary. Once the food has been inserted into the bag, the open end goes into the machine which will remove the air using a powerful vacuum pump and seal that end. The sealing is a heat process which produces a weld-like seam across the bag. This is a plausible device to have in the kitchen as it can keep foods fresh much
longer than even plastic bags. The basic FoodSaver can be purchased for about $150
while the FoodSaver Pro costs a little under $300. There are several on-line retailers which carry the FoodSaver and the basic model has also been spotted at Price/Costco.
The FoodSaver is made by Tilia, Inc. and there is another product, Seal-A-Meal made by Rival and several other products as well.
Equipment and supplies you will need for this project:
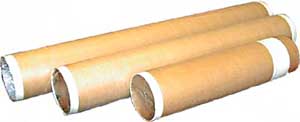
- your body tubes (shown: 6" flexible phenolic)
- enough couplers to fill the tube(s) and extend at least 1" on both ends
- a body tube bulkhead for each end of each tube which won't slide into a coupler
- your base cloth (shown: 5.7oz. carbon fiber)
- your veil cloth (shown: 3oz. S-glass cloth)
- vacuum bagging release (you need the real stuff here)
- vacuum bagging breather (cotton batting will do)
- a FoodSaver or FoodSaver Pro (shown: an older FoodSaver Pro)
- enough FoodSaver bag material for each tube length plus three calibers (tube length plus 18" for 6" tubing)
- fiberglass epoxy system (shown: West System 105/206)
- flexible plastic spreaders (such as those for automotive body work)
 |
| Fig 1. The tubes ready to be covered. |
When the air is removed from the bag, the bag will press tightly onto all sides of the tube. The bulkhead end caps prevent the bag from being sucked into the inside and the tube couplers provide extra support for the tube to prevent it from collapsing inward. Also, the extra coupler at the ends provides support for the excess width of cloth. If possible, you want to keep the cloth from bonding to the coupler (otherwise you will lose the coupler). Most importantly, you want to make sure that no epoxy can wick or be forced between the body tube and coupler. If this happens, your tube will be a loss because the coupler will not come out. Use enough couplers to fill the full length of the tubes and stick out at least 1" on both ends.
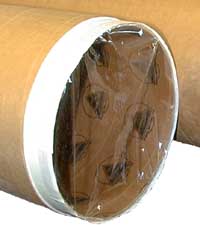 |
| Fig 2. The tubes ready to be covered - end view. |
Before installing the end couplers, wrap enough plastic wrap over the end of the coupler
to drape down past the other end. (Teflon sheet is even better, but hard to find.)
Use two pieces across each other at right angles. You should end up with one end of the coupler covered with two layers of plastic wrap, the outer surface of the coupler covered in plastic wrap and the ends tucked into the other end of the coupler. Use enough layers that you can just slide the coupler in without tearing the plastic wrap.
This way, even if some epoxy does get under the body tube, it won't bond the coupler
in place.
Wrap masking tape around the outside of the coupler, over the plastic wrap, right up to the end of the tube. Build up a good band so it covers about half the thickness of the body tube. (This is another barrier to epoxy.) Also try to get the last double-wrap of tape to go up the end of the tube a little to make a dam. Be careful not to get any tape on the outside of the body tube itself. Finish both ends of both tubes this way. Finally, cover your bulkheads with waxed paper and tape them securely to the couplers at both ends. Now you have a solid surface with only the parts you want to laminate exposed.
When lining up the cloth, it is much easier to have a reference line on the tube. Using a piece of angle iron or a door jamb, draw a bright line (red felt-tip pen works well)
along the length of the tube. You will line up the edge of the cloth with this line when you roll it on.
Cut out your release and breather. These aren't critical and are easy to handle. Make sure your release is 1" longer than the tube's circumference and 2" wider than the tube length. The breather should be a little longer so that you have a nice overlap. Set these materials aside for now.
Lay out your carbon fiber on your work table on a good cutting surface. Carefully straighten out the cloth so that two edges are at right angles and the weave is straight both ways. You need to cut the cloth slightly longer than the tube is around (the outer circumference). Cut at least 1/2" extra (for example, 3/4" for the 6" tubes). You want the cloth at least 1" wider on both ends than the tube is long. The weave along the edges tends to come out once you cut it and every time you handle the cloth, it tends to lose more and more of the edges. (See the tips section below for more.) Try to make your piece include the selvage (sewn edge), if you can, as this edge won't fray. Cut the other three edges out straight and make sure they line up with the weave.
You can cut the cloth with scissors, but a much easier and more accurate way is with a fabric cutter as pictured. This tool has a sharp cutting wheel which rotates as you drag it along your guide. Experiment with the pressure until you cut through the cloth in one pass. Note cutting mat (actually two mats joined together) which is marked with dimensions. This makes layout easier and saves wear and tear on the cutting tool and your table. Both the cutting tool and the mat can be found at sewing and craft stores.
Now lay down newspapers on your surface. Use several layers so you can remove pieces as they get dirty with epoxy. Lay your cloth with its freezer paper down on the table on top of the newspapers and get out your epoxy and plastic spreaders. Make sure the cloth is straight and the weave is aligned along the whole piece.
Now put on two pairs of gloves, one over the other, and mix your epoxy. Pour the epoxy onto the cloth and gently use the spreaders to "wet out" the entire piece. Be careful working at the edges to make sure you don't pull out any of the weave. The entire piece should be soaked with epoxy and the surface should glisten. You don't want puddles on top of the cloth, but you don't want dry spots either. For fiberglass cloth, it is easy to tell because the wet-out cloth becomes transparent; for the carbon fiber; you have to make sure the entire surface glistens.
Set the tube on its end on the floor and remove a layer of newspaper so you have another
clean surface. Remove the outer set of gloves and take a deep breath. You just finished the hardest part!
Now you need to wrap the release fabric and breather. These are obviously not as critical as the actual laminate, but you should make sure there are no wrinkles in the release as these may transfer to the cloth. Tape the breather at the overlap and at the ends so that it covers the entire tube surface. Cut a bag 3 calibers longer than the tube and seal one end with a double seal. Slide the tube into the bag so that the end is near, but not quite touching, the sealed end (using up one caliber of extra bag).
Set the tube aside to partially cure. You don't want a full cure, but you want well past the gel stage. For West Systems 206, let the tube sit at least 12 hours at room temperature. (Don't work or store the tube below 60°F while curing.) Check on the bag after 20 minutes and then an hour to make sure the vacuum holds. You should have no trouble with a new bag and double seals, but just make sure.
When this first wrap has cured enough to be hard, but not to a full cure, debag the tube and remove the breather and release. They should come off without much trouble and the breather may be usable again. Proceed to the second layup of the veil, following the same proceeded as for the base layup and bag it. Once the second layup has partially cured, debag the tube and remove the breather and release. Set aside to fully cure.
You now have the tube laminated with a minimum of resin. The tube will be noticeably lighter than the ones you've done with hand layups. It will also be just as strong and less brittle. Congratulations!
Tips and Tricks
Make sure you get the cloth edges square to the weave and cut along the same weave. Try to make your piece include the selvage (sewn edge) if you can as this edge won't fray. When you move the cloth, keep it on the freezer paper and try to keep it from distorting, which it is very anxious to do. There is some trial and error here, but you should be able to get it the first time if you are careful.
WARNING: Because the FoodSaver uses an electric motor to evacuate the air (as do most vacuum pumps and air compressors), you should not use products which are highly combustible. In particular, it is recommended that you not use polyester resins, although epoxy resins are generally fine. Please check your epoxy system to make sure that it isn't combustive (West System has no such warnings).
Submitted by: John Coker
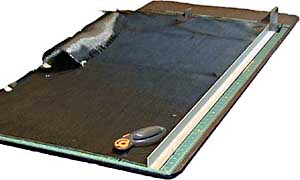
Fig 3. Cutting the carbon fiber.
Carefully set the cloth aside by sliding it onto pieces of freezer paper and set the whole thing away from your work table on a flat surface. Be very careful not to allow the cloth to distort, as it loves to do. Both carbon fiber and fiberglass cloth are very sensitive at this stage and require delicate handling.
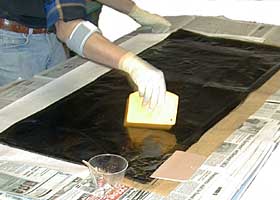
Fig 4. Wetting out the carbon fiber with resin.
Now you're ready to roll the cloth onto the tube! Start by laying the tube onto the cloth with one edge lined up with the line on the tube. Make sure the cloth overlaps the tube an equal amount at both ends. Now pick up the edge of the freezer paper and start rolling the tube across the cloth. Go slowly and smooth out the cloth and any bubbles or wrinkles. It helps to pull the tube toward yourself as you roll to make sure the cloth is tight. Peel back the freezer paper as your roll to make sure it doesn't get under the cloth as it wraps around the tube. Once your wrap the cloth around, carefully inspect the entire surface to make sure you don't have any bubbles or wrinkles. The cloth should be stretched tightly and should overlap only slightly. Ideally, there overlap should be only the frayed edges of the cloth so that it makes the same thickness at the seam as the solid cloth on the rest of the tube.
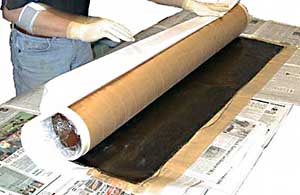
Fig 5. Rolling the carbon fiber onto the airframe tube.
Place the open end of the bag into the FoodSaver and start vacuum sealing the bag. Use the full-vacuum seal. Try to pull out wrinkles in the bag as the vacuum develops by pulling apart on the seams at the sides along the length of the tube. Once the cycle finishes, the bag will be sealed. Seal it again for good measure. If your bag is clear, you can see the breather starting to soak up the epoxy and the entire bag will be too tight around the tube to pull away from it.
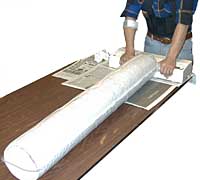
Fig 6. The FoodSaver vacuum system in use.
To remove the end couplers, use a razor saw to carefully cut around the coupler, just
past the end of the tube. You need to cut through the laminations and into the tape but if you can avoid cutting the couplers, they can be used again. Once you cut through all around, pull out the couplers and peel off the bulkheads and couplers sealed in wax paper and plastic wrap. Ideally, you can use these again. To trim the excess lamination down, use a palm sander or paper on a sanding block. Go slowly and don't sand into the tube itself; just sand the lamination down to match the tube.
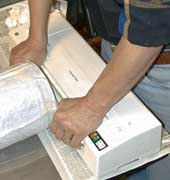
Fig 7. Closeup of the FoodSaver in use.
Here are some tips and tricks discovered while perfecting this process.
The hardest part of this process is cutting and handling the cloth. The carbon fiber is great stuff, but a pain to deal with. You need to treat it very gingerly and you keep losing the weave which is why you need so much overlap. Each time you touch the carbon fiber you will lose a weave at each cut side and each weave is about 1/8". You want enough extra so you can lose a few weaves and still cover the tube, but not so much that you have a full overlap. Cut at least 1/2" longer than the tube's outer diameter (you can always pull out weaves at the end to make a smooth transition).
