Hot Wire Cutting
 |
Background
When I found out about high power rocketry I decided to build some of the rockets that had made such an impression on me as a kid, when getting to orbit was still a fantasy. My first non-kit HP rocket was a 1/8 scale Viking 7. I wanted to have a little more detail than just the right shaped nose cone and fin outline, so I decided to make the fins scale in cross-section as well as shape. I cut the cores from aircraft plywood, laminated balsa sheet onto them, and then sanded the balsa to get the rather complex shape of the prototype fins. The final product was coated with lightweight glass and mounted with the standard through-the-wall technique. This worked fairly well, but it was rather labor intensive and each fin is slightly different since each was hand-formed
I remembered another way. About 20 years ago I attended a seminar at Oshkosh on composite homebuilt aircraft construction, and one of the things I learned was how to build an airfoil from fiberglass and foam. Here was a way to make airfoils strong enough to trust your life to and, as we'll see, once you make a template you can make any number of identical parts. My next project would put this technique to the test.
The X-17 was to be a 1/4 scale model of a Lockheed research vehicle from the mid-1950s. The prototype's fins were a simple trapezoidal planform and a symmetrical airfoil cross-section. The foam composite construction method would suit these parts nicely. The following description contains a mix of photos and procedures from the X-17 project along with new photos and practices created specifically for this article. After using the foam composite method on the X-17 and other projects I am completely sold on the concept.
Methods and Materials
The high strength and light weight of foam composite fins arise from their geometry. When engineers design a bridge, the structure is not monolithic. Instead, great strength and acceptable weight and cost are achieved through the use of thick structures in the form of box beams and other shapes. Likewise, an airplane wing is a built-up structure purposely made as thick as possible while maintaining the desired aerodynamic characteristics of the airfoil. A rule of thumb used in airfoil design states that, other factors remaining constant, doubling the thickness of an airfoil squares the strength, and cubes the stiffness or rigidity. We can take advantage of this principle, awhile avoiding the complexity of a structure made of ribs and longerons, by using the homebuilt aircraft trick: a part made of a lightweight foam core with a strong skin of fiberglass or other composites.
The fin core in this article is made from 3/4 inch blue foam insulation board from the local hardware store. A variety of foam materials are available from Aircraft Spruce and other suppliers, but the blue foam is available locally and is very cheap, at about $2.50 for a 2x8 ft sheet. The X-17 fins are about 8 inches by 8 inches and ended up weighing about 5 ounces each. They passed a stress test performed by placing the tips on wooden blocks and standing on them with my 220 pound feet.
The final planform and cross section of the fin is determined by templates shaped to the form of the fin root and fin tip. The templates can be constructed of any material that is fairly stiff and resistant to the heat of the cutting wire. Masonite is often used but for this demonstration we will use 3/8 aircraft plywood left over from other rocket projects.
Creating the tip templates is the only step of construction that requires real carel;
this is one of the advantages of the technique for those of us who are severely
craftmanship-challenged. 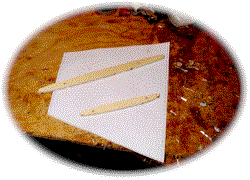 Once
you get the tip templates right, you can make perfect fins every time. I drew the
template in AutoCad, printed the drawing on ordinary paper and cut out the drawing.
I lay the paper cutout on the plywood and traced the outline onto the plywood and cut it
roughly with a hacksaw. Then sand, sand, sand with a sanding block until the shape
of the wooden template matches expectations, or until you get sick of it, whichever comes
first. Two holes are then drilled in the templates to accept nails or screws.
These will be used to secure the templates to the foam blocks prior to wire-cutting.
The foam block from which the fin cores will be cut need only be cut accurately in the
root-to-tip dimension. 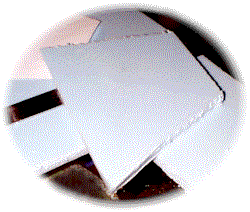 Some extra material should be left in the other
two dimensions; this will be cut off by our hot wire tool. Mark the shape of the fin
with a pencil on the foam sheet and cut the foam with a very sharp knife or razor blade.
Light pressure on the blade and multiple passes should be used to avoid bunching up
the foam under the blade.
At the forward and leading edges of the root and tip mark the mid-point of the foam
blank thickness. These marks will help ensure that the tip templates are mounted
parallel. 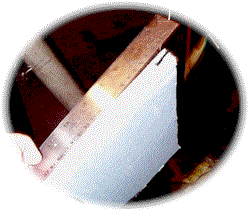 If the templates are not
parallel the final fin core will have a twist or washout. This is often desirable on
aircraft airfoils, but it's usually undesirable on rocket fins. Place the templates
on their respective ends of the foam blank, ensuring that the leading and trailing edges
of the templates match the midpoint marks made earlier, and secure them to the foam with
nails or screws.
 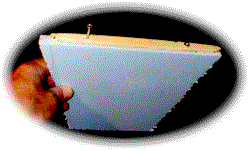 I've found that
2" deck screws work nicely. The blanks are now ready for cutting.
Hot-wire foam cutting requires only a few simple tools, easily made from scrap
materials. The general principle is to heat up a taut wire with electricity and then
use the hot wire to cut the foam. Commercially made tools are available for this
purpose but, for the small size of most of our projects, home-made versions are quite
adequate. My cutting bow is made from scraps of base moulding leftover from a home
improvement project. The wooden pieces are bolted together in the shape of an H.
Across the top of the H a piece of 3/8" all-thread rod passes through holes
drilled in the upright wooden pieces. 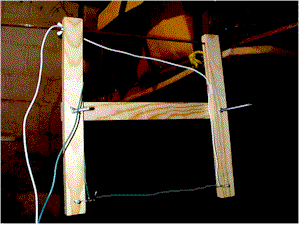 Across the bottom of the H the cutting
wire is stretched between 2 screws in the bottom of the upright wooden pieces. Wires
from the power supply are attached to the ends of the cutting wire. The cutting wire
is .032 stainless steel available from Aircraft Spruce and others. Wingnuts on the
all-thread rod at the top of the tool allow the cutting wire to be tightened as required.
The power supply is an ancient toy train transformer I found on E-bay for about $8.00.
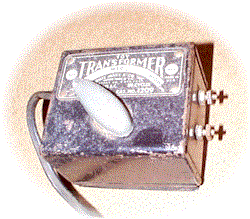 Newer train transformers will not work as their short circuit protection is
too sophisticated; they will trip their breakers the instant the power is turned on in
this application. Sometimes the old ways are best, the Underwriters Laboratory
notwithstanding. Battery chargers, variable DC power supplies, and even banks of
lead-acid batteries can also be used. About 4 to 5 amps are required for our
purposes. Hook the leads from the cutting wire to the output on the power supply and
you're ready to go.
The cutting wire should be tightened snugly with the wingnuts before the power is turned on. Don't worry about kinks and irregularities in the wire at this point. Turn up the power until the wire glows red, then back off slowly until the glow disappears. Tighten the wire again with the wingnuts. The wire will often hum while being tightened, or this can be encouraged by twanging the wire lightly. As tension increases the pitch of the hum increases. When further tightening no longer causes a rise in pitch, stop tightening. With some practice you will be able to set the tension accurately with little wasted effort. A wire that is not tight enough will sag when it is pulled through the foam and will produce an unusable part. If you tighten too aggressively the searing pain of broken incandescent wire snapping across your forearm will be nature's way of telling you to back off.
Similarly, the temperature of the wire is important. If the wire is too hot it will cut a path through the foam larger than the wire diameter and fuse the surface of the foam, both undesirable. Also, any hesitation or variation in speed while drawing the wire through the foam will create gouges in the foam from melting. If the wire is not hot enough there will be excess drag on the wire and the core will be bowed in the middle as the ends of the wire pass over the templates faster than the center can keep pace. Again, a few practice cuts on scrap pieces will enable you to set the tension and temperature correctly. A good cut produces a slight hissing noise and will pull out a thin thread of melted foam at the end of the cut. A loud hissing or bubbling noise indicates a too-hot wire. The wire should pass easily and smoothly through the foam when pulled at a speed of about one inch every five seconds.
Secure the foam blank with attached templates to a horizontal surface. This can be done by gluing tacks or brads to a piece of plywood and pressing the blank onto the tacks, making sure that the tacks are not so long as to protrude into the area through which the hot wire will pass. Alternately, the foam blank can be held down with weight such as a bag of shot. You will need both hands free for performing the cut. Hold the cutting bow with the wire near to and parallel with the leading or trailing edge of the blank. Take a deep breath and push the wire into the foam until it makes contact with the templates on both sides. Most people find that pulling the wire towards them is easier than pushing it away. Keep pulling gently and progress at a rate of about one inch per slow five-count. Take care to rotate the bow so that the wire reaches the middle and end of each template at the same time. This may take some practice. When the opposite edge of the fin is reached, pass the wire out of the foam and remove the cut material. Flip the fin over and repeat.
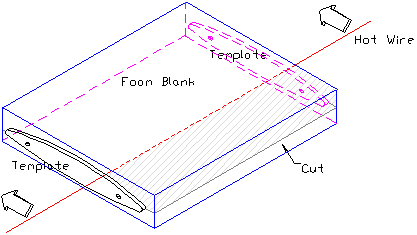
Cut especially slowly when going around tight corners, such as the leading and trailing edges of a rounded fin. For sharp leading edges do not attempt to make the wire go around the corner. Instead, insert long pins or thin nails into the leading and trailing edges of the blank and allow the wire to follow the pins. When both sides are done you will be left with a thin flashing of foam at the leading and trailing edges which can easily be trimmed or sanded off. A sanding block and 220 grit sandpaper will quickly smooth any minor bumps created during cutting. After the core is cut the holes made by the securing tacks and the template screws can be filled with epoxy or bondo. The core material contributes very little strength to the final part, so this is strictly cosmetic, aimed at avoiding minor dips in the final glass-covered surface.
Results
You now have a perfect airfoil-shaped foam core. 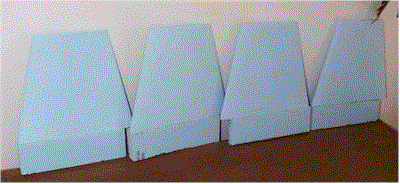 In the case of the
X-17 I added un-cut rectangular foam pieces to form the fin roots between the body tube
and the motor mount. These assemblies were then coated as one piece with glass and
vacuum-bagged. Vacuum-bagging is a great application for these fins and will make a
good part even better. See the Vacuum Bagging article for a great treatment
of this subject.
More complex fin shapes can be created by cutting individual pieces and gluing them
together before applying the glass skin. The simplest method for covering the cores
is just to make a contact layup of several layers of e-glass.  For high performance rockets more sophisticated layups could be created with
carbon fiber spars notched into the foam cores and carbon or kevlar leading and trailing
edges and end caps. The question of how much strength is enough for various
applications is one that cries out for study.
Submitted by: Bill Kirby
