Fins
 |
This only works for Estes type rockets that the fins are mounted on the body tube! If you hate to wait 20 minutes for glue to set then this is for you! First go out and buy some CA glue (I use Pacer brand). Then, put the glue on the ROOT edge of the fin (side that goes on the rocket) and put it on the tube. You have about 20 seconds to put it were it should be (you can take it off if it does not go on right, but you HAVE to be careful taking it off). Then put GOOD filets of glue on the fins so they won`t fall off on landing!
Submitted by Nick Hills
Here's another variation on gluing fins to Estes style rockets. First, make sure that the tube's glassine finish is removed using sandpaper to promote good glue adhesion. Then apply a thin layer of 30 minute epoxy to the fin's root edge except for the last 1/8" of each end. Hold the fin in the desired positon on the airframe, then apply a drop of CA at these two end locations. The capillary action will pull the CA into the joint. Hold the fin in this position for a few seconds, then continue with the rest of the fins in the same manner. The CA will lock the fins in a relatively stable position while the epoxy has a chance to soak in and give the fin the strongest hold possible.
Submitted by Larry DuBois
Model Rocket Fin Detachment
Using Cyanoacrylates (CA) and accidently glued that fin in the wrong place? What should you do? The CA manufacturers make a product called a debonder. This handy mixture (contains Acetone) will allow you to remove the mis-aligned fin or even glued skin. The debonder can be successfully used to remove a fin with perfect results. Remember to read the label carefully and heed all the precautions to avoid injury or illness. This is a handy item to keep in your glue tray.
Submitted by Doyle Tatum
High Power Rocket Fin Attachment
Fins of high power rockets need to be firmly attached to the motor mount tube and airframe. Epoxy fillets should be created inside and outside the airframe, along all surfaces so that the motor mount tube, fins and airframe, along with the motor mount tube and centering rings, create a single thrust bearing unit. Read the instructions listed below completely before starting construction.
- Use a medium cure epoxy of about 15, 20 or 30 minutes to bond the
forward centering ring(s) to the motor mount tube and let it cure. Do NOT bond the aft centering ring to the motor mount tube yet.
- Install the motor retention system into the aft centering ring and let any epoxy cure.
The aft centering ring will need to be pulled out of the airframe after the motor mount tube is installed. For example, if you used tee-nuts as part of the rentention system then screw a machine bolt into the tee-nutes.
- Smear epoxy inside the airframe about where the forward centering ring will be positioned when the motor mount is installed. A small (1/8") dowel can be used to reach inside the airframe to position the epoxy. Then insert the motor mount tube, and position vertically until the epoxy cures.
- After the epoxy for bonding the forward centering ring in the airframe has cured removed the aft centering ring.
- Use a tool like a wood dowel to position epoxy on the back side of the forward centering ring. Let the epoxy cure before continuing.
- Dab a little 5 minute epoxy to a fin root (the edge that fits against the motor mount tube), and insert the fin into the airframe to the motor mount tube. Hold the fin in place until the epoxy cures, or use masking tape to hold the fin in position. Repeat for each fin. Fast curing epoxy is only used to tack the fin to the motor mount tube. Longer curing epoxy will be used to firmly bind the fin to the motor mount tube and to the airframe.
Wipe off any epoxy that fall onto the airframe where the aft centering ring will be installed.
Creating epoxy fillets 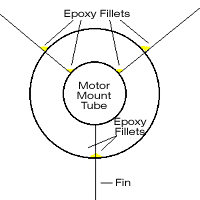
- Create epoxy fillets along the fins and airframe, and along the fins
and motor mount tube. This will need to be done in several steps.
If a rocket has three fins then three steps will be needed.
After one set of fillets have been created and the epoxy has cured,
rotate the rocket and create another set of fillets.
Two outside and four inside fillets can be created during each step.
- Test fit the aft centering ring. It may need to be sanded slightly to fit into the airframe if any epoxy accumulated on the airframe where the aft centering ring should fit.
Smear epoxy inside the airframe where the aft centering ring will be positioned, and then install the centering ring.
The fins, airframe, centering rings and motor mount tube should now be a single thrust bearing unit.
Submitted by Dean Roth
