Last spring, I did a lot of research on two-part pourable casting and mold making compounds in order to develop a drill jig for a (short run) mass production machining operation. After being introduced to the plastic, my mind started working overtime. Lots of possibilities with this material, so I decided to bring to reality one of my rocket construction concepts: a centering ring system to use with ACME fin canisters and 54mm airframe tubing. I wanted a modular motor mount adapter with an aft ring that could double as an attach point/support for the canister, and a forward ring for recovery system attachment. After making some “proof of concept” parts out of wood, I decided to migrate the design to plastic, and contracted a shop to turn metal “master” parts on a lathe for use making a rubber mold. To make a long story a little shorter, the project was successful, and many sets of parts have been produced and sold to local rocketeers (at pretty much material cost :). I learned a lot about casting, mold making, and prototype development; skills I will use often in future Rocketry pursuits, as well as non-hobby projects.
We’ll be talking about and using two different classes of materials to make a finished plastic part. One of the materials will be used to make a mold and the other for casting a part utilizing the mold. Both are essentially 2-part materials, mixed 50/50. Like epoxy, mixing ratio is very important, or else portions of the compound will not catalyze, spoiling the mold or casting. These materials “cure” in ambient air, and require little time from pouring to complete catalyzation, though some of the mold making compounds take several hours. Of course, the materials can be purchased in different formulas to adjust catalyzation time to a minute or two, or several hours, depending on the working time necessary for the application. First glance tells me the longer the pot life, the more expensive the product.
Additionally, each mold making compound has properties suited to different applications. In general, softer mold making compounds better capture detail and more readily release undercuts in the master part and castings, while harder compounds tend to last longer, but sacrifice some of the detail. I chose Synair Por-A-Mold S555 for my first mold making compound, since I wanted a fairly hard mold. No real need for the mold to capture intricate detail or heavy undercuts, but I did want it to last through several castings. Pot life is about 10 minutes, though total cure time is 24 hours.
Casting materials are also graded for ability to recreate detail. Alumalite, with a pot life of two minutes is a very hard material and is not the best material to capture heavy mold undercuts, while Synair’s “Mark 3,” with an advertised pot life of 3 minutes, is somewhat softer, and more suitable for greater detail. The grades of material are described in product literature, along with comments regarding suitability for applications. Predictably, the harder materials are more rigid, while the softer materials are a little more flexible. Each application has a different set of requirements, so selection of compounds can only come with experience, assistance of the product literature, samples from the manufacturer, as well as experience of others. I like Mark 3 because of cost and flexibility, but Alumalite provides a better finish and releases from simple molds easier. I’ll be using Mark 3 in future classes, but when I run out, I’ll likely order Alumalite. It’s just a little easier to get good results. The process for using either is the same, so for purposes of the class, it shouldn’t matter what we use.
Of course, I haven’t mentioned release agent yet, possibly the most important material we will use in the project. It is sprayed on the master part when making the mold, and in the mold when casting a part and is allowed to completely dry before applying the molding or casting material. Use the release agent the mold material manufacturer recommends until you have enough experience to mix and match and know which products are compatible. I’ll be using Synair “Synlube” in an aerosol can with the Synair products, since I have had very good results with it in the past, with both Synair and Alumalite casting materials.
The following is a list of materials I have experience with, and the manufacturers:
Alumalite Super casting plastic
Synair Puma Polymers1
Por-A-Mold Hard S555 (Hard) $54 for 2 quart kit
Por-A-Kast Mark 3 Prepol, Casting plastic $43 for 2 quart kit
Synlube IsoKote 531 Aerosol mold release
Both companies, as well as others that manufacture similar products, sell many other casting and mold making products. Those listed above are the only ones I have experience with, so if you want to follow along with the class, you might have to improvise if you pick something else. Again, these aren’t necessarily the best, just what I have on hand and have experience with. For a future ARCAS installment, I believe Darrell will be using RTV mold making compound supplied from Alumalite in a mold making/casting kit, so he should have insight about those products to share with us in the near future.
Lastly, we need to decide what we want to duplicate in this class with the mold and plastic. I was thinking a gag golf ball would be fun, since it’s simple and de-molds pretty well, but Darrell was hinting that it might be a good idea to keep it rocketry related. Really doesn’t matter to me, but I would suggest keeping it small. I suppose I could run the class more as a “here’s what I did and how I did it” kind of thing instead of a “lets do this together step-by-step” sort of thing. It’s up to you folks.
I’ll be demonstrating how to make a mold to duplicate a simple flat sided part (more complex shapes require more advanced mold making methods. My example is a set of prototype centering rings, made specifically for use with a 54mm Acme fin canister. Of course, this method can be applied to duplicate most any thing you can imagine. Well, I did say “Most” anything, didn’t I?
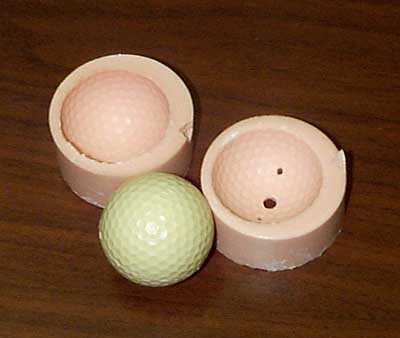
Below is mold and casting of a gag golf ball a golf buddy of mine requested. The cast part bounces, curves, and wobbles, no matter how gently you hit it!
For starters, any mold making compound you order will come with a set of instructions. The instructions I received with the Synair products are very detailed, and show their own examples how to make several different types of molds. By all means, follow the directions that come with the product that you purchase. Each manufacturers materials have their own limitations and quirks, so take a few minutes to study their notes and reccomendations. I would rather consider this class as an opportunity to demonstrate how easy these materials are to work with, and encourage others to give it a try.
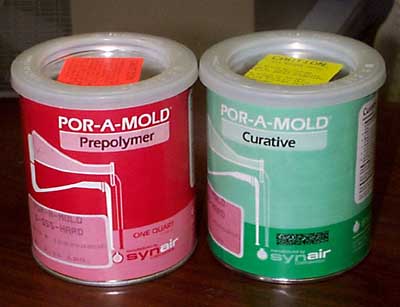
The mold making material I will be using is Synair Pour-a-mold, S555. Additionally, I’ll be using Synair’s release agent, Synlube, in an aerosol can.
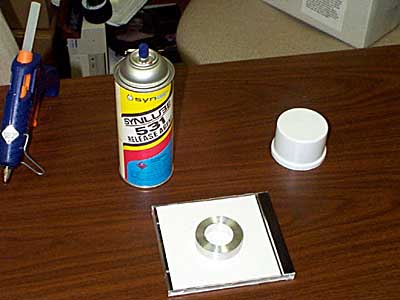
The other items we will be using are: a CD-ROM jewel case, lots of disposable cups and spoons, a roll of paper towels, small disposable paint brush, kitchen type measuring spoons, a piece of computer ribbon cable, CA adhesive, and a hot glue gun.
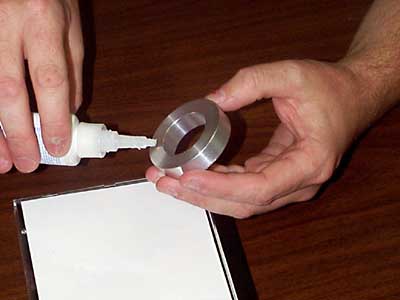
To allow easiest removal of the part from the mold, you need to select which side of the part should face down when the mold is poured. This will be the open side of the mold, which should reflect the largest part of the mold master. With that in mind, use CA to adhere the part to the jewel case, using just a drop or two to keep it from moving around. The smooth surface of the case makes for a clean and true surface for the mold face, but any non-pourous surface would yield a usable mold.
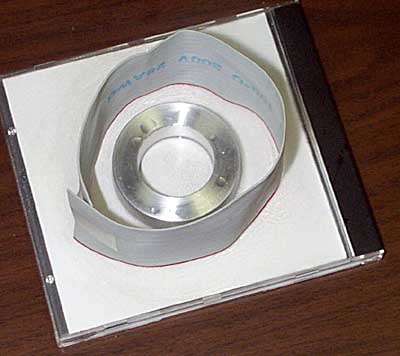
Next, build a dam around the part to contain the runny mold goop when it is poured over the part. I’ve used scrap airframe tubing before, but in this example I am using computer ribbon cable. Why? Well, flat ribbon cable is a good example of the variety of materials that can be used. Most anything that will contain the compound will suffice, but it’s best to use something disposable.
Hot-glue the dam to the jewel case, surrounding the mold master, and seal any openings or overlaps. S555 isn’t as thin as water, but it does tend to find the bigger nooks and crannies to leak through.
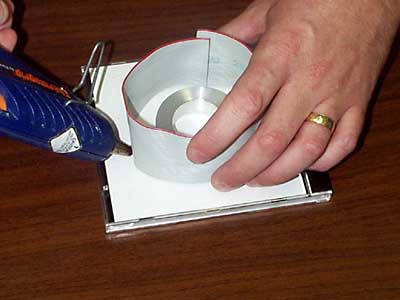
Spray the dam, base, part and everywhere else the mold compound will touch with several light applications of release agent, letting the solvent flash off between coats. If not applied properly, the mold compound will stick to the master part, or the base, and likely ruin the mold. Again, the manufacturer’s literature should be helpful to you, discussing the proper release agent, and how to apply it.
The next step is to mix the mold compound. Synair S555 is shipped in two separate containers, to be mixed 50/50 for a proper ratio. I noted that a pretty exact ratio, and thorough mixing are required for the mold to properly set up. At least two of my early molds had spots where the compound didn’t solidify.
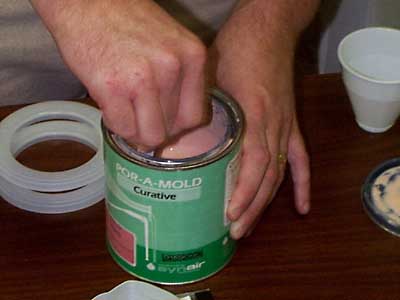
After ensuring the materials are well mixed in the cans by gently stirring, use a measuring cup or spoon to transfer enough material from each can to mix the volume you estimate you need for you mold. I mixed one-half cup of each component to make a total of one cup mold material for the pictured centering ring mold. It was more than enough.
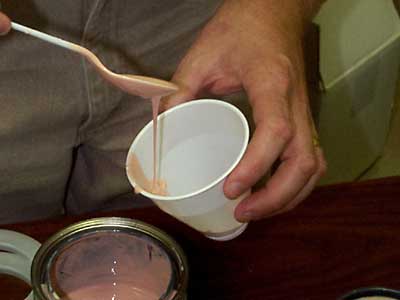
Carefully stir the mix until it is a consistant color, being careful not to introduce excess air bubbles by too vigorous of a stirring action. You have fifteen or twenty minutes to work, once the S555 is mixed, so no need to be in too big of a hurry. It is important no air bubbles form in undercuts and overhangs, so gently brush the compound in any recesses on the master, then pour it, letting it overflow in to the rest of the enclosed mold area.
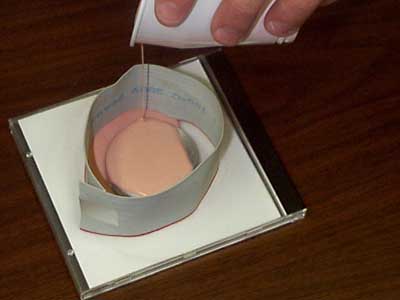
If by some miscalculation you haven’t mixed enough material to cover the mold master with at least 1/4” of material, don’t be tempted to try to quickly mix another small batch to finish it off. I’ve done this, and they just never quite mix together properly. Just let the mold cure, toss it in the trash can, and try again.
Once the mold compound is poured in the mold master, it will likely have a lot of bubbles inside, even if you were careful when mixing it. To get good results, I tap the mold for ten or fifteen minures to encourage pockets of gas to rise to the surface. A vibrating table or degassing chamber would provide the best results, but I have neither, so I do the best I can with what I have.
The S555 instructions give a 24 hour “full cure” time, so once you are satisfied you have removed all the bubbles you can, just set it aside and find something else to do the rest of the day. Again, different compounds have different curing times, so follow the manufacturers instructions.
Once the cure time has passed, gently twist the mold, and the super glue should snap, freeing the mold from the Jewel case. Next, remove the containment material as necsssary, and gently knead the mold to work the mold master loose.
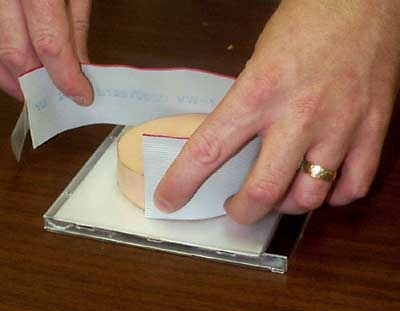
A gentle poke on the back of my centring ring mold, and the master separated from the mold.
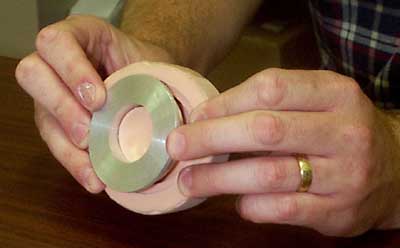
With the surface of the ID wanting to grab the mold, it was still an uphill battle to get it the rest of the way out, but a little soap and water and Viola’, a perfect mold of the metal centering ring.
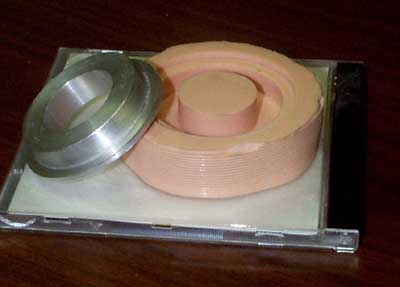
Now what? Well, we’ll talk about that in the next lesson. I’ll be using Synair Mark 3 Casting plastic to fill the mold, and make a plastic duplicate of the original metal centering ring.

Until then, have patience, and don’t be surprised if your first and/or second molds just don’t quite work out. The more accurate you can be with liquid measurements, thorough mixing it, and liberal with the release agent, the more success you will have.
Now, lets get ready to cast a duplicate of the part. I have Synair Mark 3 Casting Plastic on hand, but there are many suitable alternatives. I have used Alumalite “Super Casting Plastic” as well, and actually prefer the finished product to the Mark 3 casting. It seems to de-mold a little better than Mark 3 as well.

As with products in the other lessons, follow the manufacturer’s instructions, and use a release agent intended for use with the products at hand. I’m using Synair Mark 3, and Synlube in an aerosol can, so everything should be compatible.
Start by spraying several LIGHT coats of the release agent on the mold, coating all surfaces with a mist. Let the carrier “Flash” off before applying subsequent coats, being careful not to apply too much liquid at a time. Puddles dry slower, and will require a longer wait between coats.
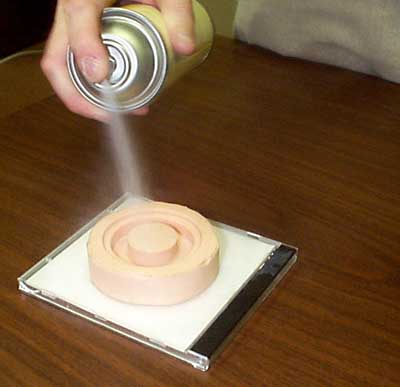
Once your mold is sufficiently coated with release agent (this is a rather subjective measure, but for the first couple of castings in a new mold, the more release agent the better!), mix the plastic and immediately pour the part. Mark 3 is a 2 part plastic, mixed 50/50 for a proper ratio. It doesn’t seem terribly sensitive to improper ratio, but no doubt the strength of the part depends directly on a proper chemical composition.
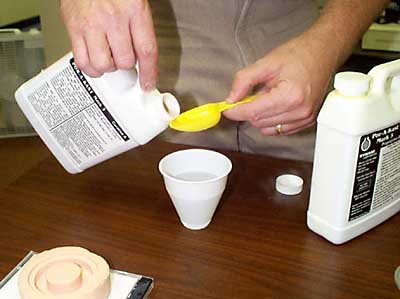
Hint: To get an accurate estimate of the amount of plastic necessary to fill the mold, before spraying with release agent, fill the mold with water and measure the volume of water required, and add an additional 10%. This is the total amount of plastic you should mix.
Use a measuring spoon or small cup to measure estimated necessary amounts of each liquid component in to separate disposable cups, than pour one part in to the other, and gently mix.
With Mark 3 or Alumalite, the working time is very short, around 2 minutes according to the manufacturers directions, but I found a minute to a minute and a half was more realistic in a 75 degree F room, with the components at room temperature. Incidentally, a minute is adequate for pouring a part as simple as the centering rings.
Hint: To get the full advertised working time from the plastic, before mixing, cool the components to the optimal working temperature specified by the manufacturer, around 60F for Mark 3.
Gently pour the mixture in to the mold, filling it to the top. Be aware of surface tension, and the fact that it may cause a slightly concave surface on small parts. I overfilled my mold slightly, using surface tension to support a slightly convex structure, which can be shaped later as needed.
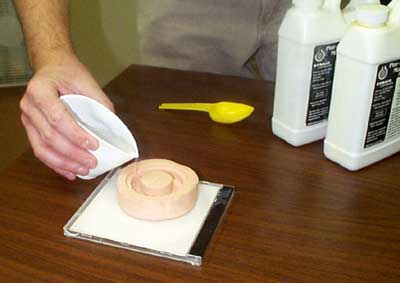
Well, there won’t be much of a wait for the liquid, thin as water, to transform to a solid plastic part, so gently bump or vibrate the mold the encourage air bubbles to rise to the surface. As soon as the top starts to change colors, you might as well just step back and watch, because whatever air is in the plastic will be there permanently.
Within several minutes, you should be able to de-mold the part. If the mold was made with care, and the surfaces properly prepared with release agent, the finished part should de-mold with slight effort. I have found that the first part to be reproduced sticks in the mold the worst, so have patience and take your time, taking comfort knowing the next part you make will likely de-mold much easier.
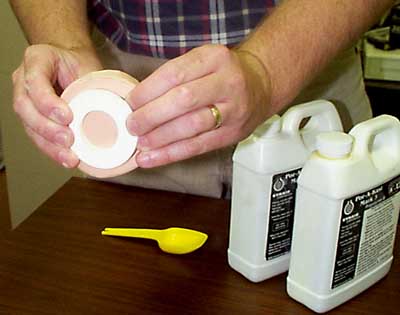

Well, the rings aren’t perfect (notice the signs of air bubbles on the corners), but they do what they need to do. The more careful you work, the better your molds and reproduced parts will turn out.
Remember the convex shape on the back of the rings? Fortunately, the plastic (Alumalite or Mark 3) can be worked very easily with common hand tools. Drilling, filing, grinding, or sanding is very easy. I used a block to sand the large flat surface of the ring flush, breaking the convex shape.
Additionally, the plastic can be tapped or pinned, and expected to be as durable as any other solid plastic part. It does have it’s limitations, but seems quite adequate for centering rings, nosecones, and electronics mounting applications, as well as countless other rocketry and hobby/non-hobby applications. My first application for Alumalite was a temporary/short life machining jig. The final product cost a fraction of what a machine shop would charge to make it, and I learned a lot about pourable plastics in the process.
Fibers, micro-balloons, and other pigments, lightening materials, and strengthening materials can be added, so the applications are almost endless. Just follow the manufacturer’s recommendations for fillers, so you are assured of using compatible materials.
What else is there to it? Well, for this project, this installment should pretty well wrap it up. If you have completed a project such as this, you should be pretty well primed for more challenging work. A complex 3-dimensional object, like a golf ball, requires a slightly different technique for fabrication of the mold, and for filling it. I guess if I get a response from a few of you, I’ll go ahead and do a class on the golf ball mold, not that you would want to make gag golf balls, but because the techniques for making it are the same for most any 2-part mold you might be confronted with.
Submitted by: Chuck Andrus
-
Por-A-Mold, Por-A-Kast, and Synlube are registered trademarks of PUMA Polymers. Or, at least, they were. It appears that the trademark has exprired. Old stock ist still available online. Synlube is now IsoKote which is manufactured by IsoTec. ↩