
Dynacom puts beautiful 10° bevels on its fins, but hand sanding a consistent bevel is too hard. However, good bevels can still be done by hobbyists. Precise cutting of G-10 fiberglass is pretty difficult, although one could imagine using a router jig to make it work. This article describes how to do it with a disk sander.
Disk sanders are not an everyday tool, but they are common in home workshops and smaller size ones can be purchased inexpensively. They are also a very useful tool for modellers, allowing quick but controlled stock removal. If you have access to a disk sander, you might like to give this technique a try. Here we show a 12” disk sander, but since you’re actually sanding a very small area, a smaller sander works fine, and is probably safer to use.
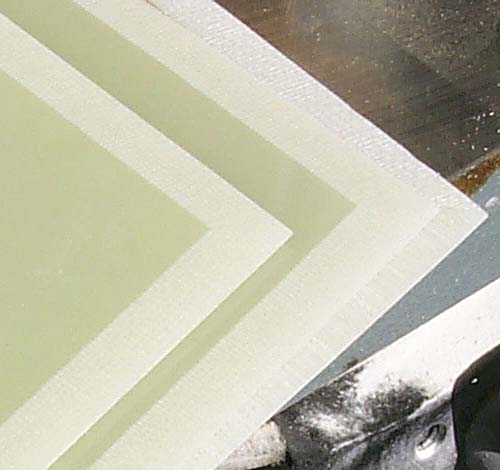
First of all, let’s look at the results. Consistent and accurate results are almost impossible to achieve by hand, but look at how the fins turn out!
Trying to hand guide a fin through the disk sander would be just as hard as sanding by hand, not to mention extremely dangerous. 10° is a very acute angle and that leaves your knuckles too close to the sanding disk. So what do we do? We build a jig!
Since disk sander tables only tilt up and down by 50°, we can built a jig whose face is angled 80° from its bottom. This means that the face would be at a 10° angle to the disk when the table was set at 90° (the normal position). It is also important to have a plate at the bottom of the angle for the edge of the fin to ride on as it is pushed past the disk.
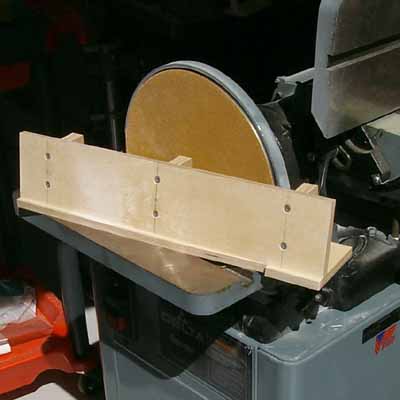
Note that “floor” at the bottom of the angled face. Also note how the floor is relieved ¾ of the way along to allow clearance for the disk. This way, the fin is supported by the floor in front and behind of the disk as it passes over.
This jig is built out of birch plywood (always good jig material). The base and face are ½” plywood and the supports are ¾” plywood to provide enough thickness to screw into. The jig is glued and screwed together, making it very srong. Note that you must recess the heads of the screws so that the jig will sit flat on the table and the fins won’t hang up on the face.
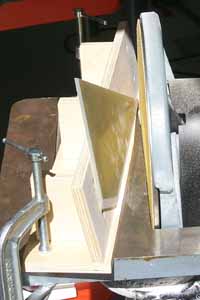
Place the jig at an angle to the disk. If the face was parallel to the disk, it would be hard to start the fin, but by placing it at an angle, you can feed the fin in and the sanding occurs right at the edge of the disk. Position the jig so that the closest part of the face is a little more than half the thickness of the fin from the disk. This distance controls the thickness of the edge.
When feeding the fin past the disk, keep it tight up against the jig all the way through. Also, make sure the edge you’re bevelling stays against the base of the jig all along its length. These two things are key to a consistent bevel.
Unfortunately, this brings your knuckles very close to the disk. Be careful! That disk will win a contest with your skin every time. (This is why a smaller disk would be safer, since your knuckles would pass above its edge.’, caption: ‘’, class: ‘picture–small’ %}
Another thing to be careful of is the dust from the fiberglass. Fine figerglass dust, especially dust produced by sanding, is very bad to breathe. The fine particles get a static charge from the sanding process and will stay in the air for a very long time.
Wear a respirator and protect your hands and arms from the dust. Even though the dust doesn’t really hurt your skin, it’s almost impossible to wash off and you will feel “itchy” for days. Use latex gloves and disposable sleeves. Also, keep a shop vac on and pointed at the part of the disk where most of the dust comes off as you work to collect as much of it as possible.
Submitted by: John Coker