
Introduction There are several published techniques for cutting body tubes. The most common is to mark all around the tube, cut the tube longer using an X-acto blade or razor saw, and then sanding down to the mark. This technique doesn’t work as well as it should for some, especially with paper tubes. But, there is a technique which is easy to use and produces finish results without sanding. As woodworkers know, the answer to many cutting problems involves using a “jig”, a framework that supports your work while you cut it. Borrowing from that tradition, what follows is a simple tube cutting jig which works with both phenolic and paper tubing, even cutting Estes body tubing.
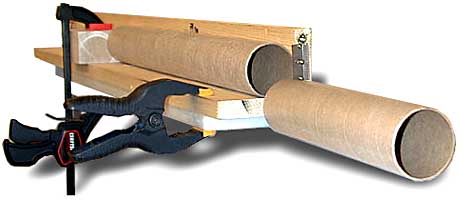
Building the jig The jig is made with two 1x4” boards glued and screwed along one long end. At the right end (if you are right-handed), a single edge razor blade is attached so that it sticks out into the L shape about 3/16” (see Figure 1). That’s it! You can temporarially mount the jig to your work bench with screws or as shown with a couple of clamps.
Using the jig To use the jig, clamp a stop block the correct distance from the razor blade so that you can rest the bottom of the tube against it. Then press the tube against the razor blade, using only moderate pressure, and rotate the tube with both hands. You should cut through a paper tube in 2-5 turns and a phenolic tube in 3-10 turns, depending on the thickness.
Lessons learned This jig was originally built with the blade on a movable arm, but this didn’t work as well. The main problem is that the spiral winding on paper tubes causes the razor blade to “wander,” making it very hard to get clean cuts. If you decide to modify the jig, make sure the razor blade is firmly supported so that it can’t flex at all. If you look carefully, you can see that the razor plade is actually mounted with three screws.
Submitted by: John Coker