Camera Designs for High Power Rocketry
| ELECTRONICS |
|
Altimeters
Accelerometers Timers Cameras Data Acquisition RF Interference Internal Wiring Dolphin Camera
ELSEWHERE |
 |
|
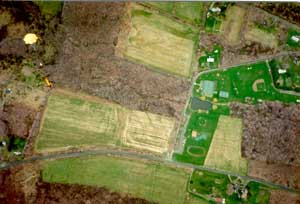
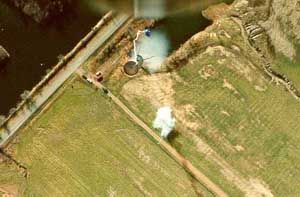
California 1 (51k) Connecticut 1 (90k) Connecticut 2 (66k) Kansas 1 (62k) Kansas 2 (30k) Missouri 1 (90k) Missouri 2 (66k) Oregon 1 (65k) Oregon 2 (70k) Clicking on these links will pop open an image window on top of your current browser window. |
)
)
)
)
)
)
)
)
)
Photography Basics
Great photographs start with properly exposing the film to the correct amount of light. Proper exposure of the film is based on three factors that are all interrelated and most of you are familiar with them. The shutter speed is to amount of time the film is exposed to the light. The aperture is essentially the diameter of the hole where the light passes through. Film speed is a property of the film that determines how much light is required to properly expose the film. Film size is also a factor that determines to quality of the photograph (but not with the proper exposure). This article will discuss each of these and how they are related in the application of flying a camera in a rocket.
Shutter speed
 |
Aperture
The aperture is actually a ratio of the focal length of the lens to the diameter of the hole. Since the focal length of the lens is fixed, the aperture is essentially a measure of the diameter of the hole with an inverse relationship. The larger the hole, the smaller the aperture number. For a given film, the larger the opening (smaller the aperture number) the faster the shutter speed required for proper exposure. Another aspect of the aperture is the depth of field of focus. Since most applications in high power rocketry deals with focusing on images very far this usually isn't a problem. If you are trying to capture something close like the booster falling away but want the ground to be in focus too there can be a problem. The larger the aperture diameter (smaller number) the smaller the depth of field. This means that if you are focused on infinity, the closest an object will also be in focus is say 50 feet. The depth of field is also a function of the focal length of the lens.
Film Speed
Together the shutter speed and the aperture control one thing: the amount of light that reaches the film. Slowing the shutter speed or opening up the aperture allows more light to reach the film. Different film speeds, measured in ASA, require different amounts of light to properly expose them. Slow film speeds (ASA 25 to ASA 100) require more light than fast film speeds (ASA 400 to ASA 1000). The slower the film speed, the smaller the grain size of the image on the film. This results in better quality photographs.
Film Size
 |
For cameras on board rockets the best photographs come from a combination of a high shutter speed, therefor the aperture must be open, slow film speed for smaller grain size, and a large negative. This combination is difficult to achieve. Automatic cameras need faster film speed in order to increase the shutter speed, but the faster the film speed, the grainier the photographs on enlargement. It is a trade off for automatic cameras to use a fast film to increase the shutter speed and the use of grainier films.
Rocket Cameras
Obviously, cameras on board rockets should have a built in motor drive to advance the film so you can take the entire roll of film on each flight. Also you should use cameras that have an electronically controlled shutter release switch. This way you can utilize electronic timers to drive relays and accurately control when the camera will take the pictures. The relay is wired in parallel with the cameras own shutter button. Other methods to activate the camera include using a servo or motor driven cam to push down the actual shutter button on the camera. However, this method adds more weight and size to the required payload space. It's only advantage is that you do not have to open up the camera for the connections.Though some have flown the Disc, 110, and even Polaroid� cameras, by far the most popular is the 35mm cameras. The Disc and 110 cameras have smaller and fewer negatives than 35mm and the Polaroid� cameras are very large. The two types of 35mm cameras that will be discussed are the point & shoot and the single lens reflex (SLR) cameras.
 |
SLR's have very fast shutter speeds (1/1000th to 1/8000th second) to freeze every picture, very fast film advance rates (2 to 5 pictures per second), and manual exposure allows precise shutter speed and exposure control. However SLR's are more expensive, larger, and heavier than point & shoot cameras, which require bigger rockets and motors. However, because of the faster shutter speed and manual control of the aperture, the photographs are clear and properly exposed thereby making SLR cameras by far the best for high power rocketry if you are willing to take the chance and spend the amount of money required to fly these large rockets. Styles
 |
Configuration 1
One common design is to have the camera looking straight out the side of the rocket and then reflect the view via a first surface mirror down the side of the rocket. This gives very nice shots down below the rocket during takeoff so there's plenty to photograph. If you design your recovery system for the payload section just right you can also get pictures during decent too. Some disadvantages to this type of design are mounting of the mirror and the greatly increased drag due to the mirror sticking off the side of the rocket. Since altitude attempts are not generally associated with a camera payload this is not a problem other than trying to determine the center of pressure of the rocket. Another concern is that the camera must advance the film rather fast even to get a few shots during the burn of the motor. The flame and smoke are very nice to capture as well as the booster falling away at separation.
Configuration 2
Some cameras are mounted so they look straight down on decent with the parachute. These shots are excellent for general aerial surveillance photography if you want to map out your launch site. You can also try to capture your booster as it descends below the payload section. Because this design has no mirror, which itself can be difficult to get the right size and angle, you can get a lot more altitude for a given motor. Its great for point and shoot cameras which have a wider angle lens and the slow film advance rates (since the decent of a rocket doesn't change relatively quickly during decent over a 2 second period).
Configuration 3
Having the camera look straight out the side of the rocket gives nice horizon shots like looking out of a plane. It does allow pictures to be taken during boost, coast, and decent phases and you don't have to mount any mirror.
Conclusion
 |
Although its not that difficult design a camera rocket and even easier to find a suitable camera for it, depending on the camera you use and design of rocket you choose, it can become quite difficult in preparing the rocket for flight. Not only do you have to prepare the motor and parachute, you must also contend with preparing the camera and activation circuit. Just remember to keep the KISS principle and remember that a good camera rocket flight is one where you get your camera back. Everything else is just gravy.
Submitted by: Douglas Gerrard, TRA #568
*All arial photographs are copyright 2000 by Douglas Gerrard and no reproduction is allowed without the express permission from the author.
