
Dean has contributed two different methods of making your own ejection charges: cardboard cannisters and a simple method using plastic wrap.
Ejection Canisters
Ejection charge canisters for small to moderate sized airframes can be easily and quickly constructed. Most materials can be purchased from home improvement and hardware stores, with the exception of the electric matches.
These canisters use a low current electric match (Daveyfire or Oxral) to ignite the ejection charge, not a photography flashbulb. Electric matches are more reliable and vary less from batch-to-batch than flashbulbs. But even electric matches should be tested with a continuity tester prior to use.
Redundancy in the recovery ejection system can help prevent property and personal injury. A more reliable recovery system can be built by using dual electric matches per canister. Both matches can be connected to the same electronic controller, or each electric match can be connected to separate controllers. If the rocket design allows for redundant ejection charges, then a single match per canister can be used, with each canister wired to a different electronic controller.
Materials
Materials list:
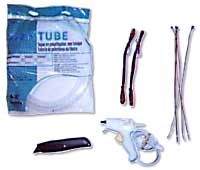
- Hot glue gun
- Polyethylene tubing (1/2” outside diameter, 3/8” inside diameter)
- Knife to cut the polyethylene tubing
- Electric matches
The electric matches with blue and red wires (center) are from Oxral. The electric matches with the orange wires (right) are from Daveyfire. Both brands work equally well.
An advantage of translucent polyethylene tubing over cardboard tubing for the canister is that the placement of the electric match and black powder can be seen to ensure that the matches are not buried in glue, and that the black powder covers the matches and is sealed in by a masking tape cap.
Construction Steps
If your polyethylene tubing is rolled, begin by unrolling the tubing and straightening it as much as possible. A slight curl in each canister will be O.K. Cut the tubing to the desired length, about 2” to 2.5” long pieces
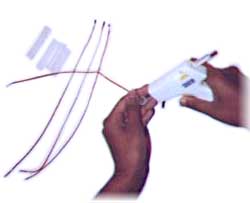
If the canister will use a single match insert the match into one end of the tube about 3/8”, and add hot glue. You want about 1/4” of glue in the tube under the match’s head, and position the head to just be above the glue. If a little glue gets on the match’s head the match will blow it off when it fires.
Hold the tube until the glue cools enough that it no longer runs. you may need to rotate the tube to keep the glue evenly distributed.
Canister Usage
Materials to prepare the canisters for flight are listed below.
- Masking tape, 3/4” or 1” wide, cut into 1” long lengths (one per canister)
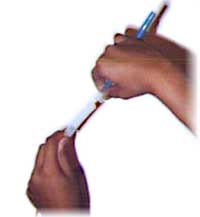
- A pen with a rounded end or other object that fits into the tube
- Black powder and measuring cup
The masking tape is used to seal the tube so that the powder does not fall out.
Preparation Steps
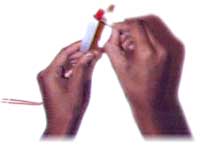
- Measure the amount of black power needed for the ejection charge and pour into the canister.
- Fold a piece of masking tape over the pen with the adhesive on the outside. The pen, or other object that fits into the tube, should have a rounded end so that the tape is not damage during insertion into the tube.
- Push the tape into the tube down to the black powder to create a cap that keeps the powder in the canister.
- The canister is ready to be used.
Questions & Answers
Q: The match head is partially buried in the glue. Can the canister be used?
A: Yes, the match will still ignite the black powder provided the exposed match head is in contact with the black powder.
Q: When I add the black powder the match head is above the powder.
A: The canister cannot be used. The masking tape used to keep the powder in the tube may prevent the match from igniting the powder.
Q: Isn’t using two electric matches per canister a waste of money?
A: If we lived in a perfect world where everything always worked as desired, yes, it would be. But our reality is not perfect. Electric matches can fail. Electronic recovery system controllers can fail. The author believes it is better to error on the safe side. Perhaps one match per flight will be wasted because the other one will always work. However, that’s a better situation than having a rocket smack into the ground, person or car because a charge failed to fire.
Plastic Wrap Charges
Large and small ejection charges can be quickly and cheaply constructed from common household materials.
Materials
- Plastic wrap - whatever brand you have
- Low current electric igniter. Pictured here is a Daveyfire N28B.
- Masking tape
- Black powder
Procedure
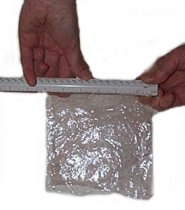 The plastic wrap is 12” wide. Pull out and cut off a 12” long piece.
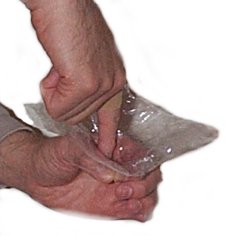 Fold in each direction so that you now have a 6” square.
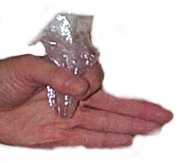 Form an “oh” with a thumb and finger. Lay the square over it and press in with a finger to create a well. Black powder and an igniter will be placed into the well.
- Pour black powder into the well.
- Insert an igniter.
- Twist the plastic wrap around the igniter and wrap with masking tape. Excess plastic wrap can be cut off.
In the top right corner is the black powder and igniter. Masking tape is wrapped just in back of the black powder to create a seal.
The author encourages the use of two igniters per charge. Though the probability of a commercially manufactured electrical igniter failing is low, the use of two igniters per charge further reduces the chance of personal injury or property damage from a recovery system failure.
An ejection charge can make the inside of an airframe dirty. The soot can be contained. In this photo is one idea. A PVC pipe fitting is attached to the top of the electronics bay. The ejection charge is placed into the fitting.
Submitted by: Dean A. Roth