Introduction
Sooner or later you wil want to know how to retro-fit a normal rocket kit with an altimeter so that it can be used with a hybrid motor. The hybrids fit into a standard 54mm motor mount, so you can theoretically replace a regular 54mm motor with a hybrid. However, since the hybrid doesn’t have an ejection charge (no forward closure, just the N2O tank), you need to use an altimeter for recovery system deployment.
The standard way to use an altimeter is to put it the electonics into the payload section and run the actual ejection charge (black powder) into the main body tube. However, what if you have a rocket with no payload section or a rocket using the PML piston ejection system? (You need the ejection charge to fire more-or-less from the forward end of the motor to make PML piston slide forward.) The Public Missiles Ltd. Aurora is billed as “hybrid ready,” but it is just a standard high power 4” kit with the addition of a self-contained ejection system.

The neat thing about the Aurora’s ejection system is that it’s not really part of the rocket, but just an altimeter bay fitted for the Robbie’s Rockets Loadable Ejection System (L.E.S.). It fits over the top of a hybrid motor and replaces it in both function and position! This means you can use it and a hybrid in a rocket built for traditional delay-based ejection. For the benefit of others who would like to build it, the instructions are reproduced below. Note that the housing tube needs to fit over the N2O tank and inside a standard 54mm motor mount tube. (It fits tightly in the PML motor mount tubing.)
Assembly and Set-up
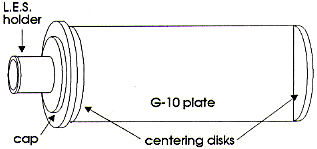
Use epoxy or thick CA and accelerator to assemble the components as shown. Be sure the G-10 plate is perpendicular to the plywood disks. Drill a 3/32” hole through the plywood cap centered with the openning in the L.E.S. holder of the wires to pass through.

Do not glue the tube to the housing. The cap should have a fight friction fit in the tube. Drill one or two small holes in the cap to allow the ejection charge wires to pass through. Use the supplied bolts, nuts, and stand-offs to mount the timer or altimeter to the G-10 plate.
Disarm the timer or altimeter before continuing.
Pass the ejection charge wires through the hole you drilled In the upper bulkhead and attach them to the timer or altimeter. Slide the LES ejection charge into the holder. If it feels too tight, sand the ID of the holder by rolling up a piece of 120 grit sand paper and moving it back and forth.

The toggle switch is for power. The two blue terminal blocks are for the apogee and low elevation igniters.
Friction fit the extended end of the ESH tube onto the N2O tank by wrapping a layer or two of masking tape around the top end of the N2O tank. Now arm your device and slide the housing tube over the frame. Slip the module over the top of the N2O tank. Slide the entire assembly into the motor mount tube of the rocket. Securely attach the motor to the rocket. When using an altimeter, vent holes must be provided in the airframe, motor tube, and housing tube. Make sure all holes are aligned before flight.
Altimeters provide for dual deployment, but this is much more difficult to retro-fit. So usually one will just use the apogee connection for the (only) ejection charge. PML sells a nice dual-deployment retro-fit kit, the CPR-2000, but this requires extensive modifications to a rocket and may be impossible after the rocket has been built.

Note that you need to drill a hole for the N2O to vent once the tank is full. Drill an 1/4” hole 11” from the bottom of the motor mount tube through the side of the main body tube and through the motor mount tube.
You will also need to drill a vent hole for the altimeter bay. Drill a 1/4” hole through the body tube, through the motor mount tube (if it extends that far up) and through the wall of the ejection bay.

The hole should not be in line with any fins or the launch lugs (nothing which would cause turbulence forward of the hole). If you drill this hole in-line with the vent hole, you can line the bay vent hole with the hybrid motor vent nozzle before inserting into the motor mount tube from the rear.
Submitted by: John Coker